Supporting Technology with Technology.: Enable 24 bit color in RDP for XP or 2003 Server


Supporting Technology with Technology.: Enable 24 bit color in RDP for XP or 2003 Server

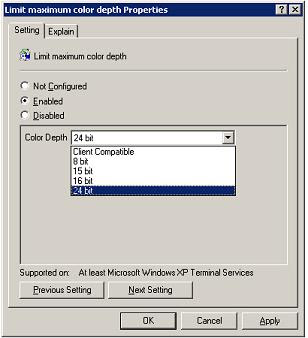
The default maximum color depth for rdp connections to Microsoft windows XP or Windows 2003 servers is 16 bit color. Connect with true colour 24 bit rdp to XP or windows 2003 server. The pre-defined default color limit on XP or windows 2003 server limits the color depth of RDP connections made to the the systems to a 16 bit maximum but can be changed by using group policy editor on the local system system. How to configure the "server side" of remote desktop to accept connections at 24-bit true color. Windows 7, Vista, and server 2008 already allow higher that 24 bit color by default.

How to add dsa.msc to 2008 member server

How to add dsa.msc to 2008,2012,2016,2019 member server.


Share/Save/Bookmark

Enhance your Support Services with Software for Online Desktop Support


It's a simple and quick installation to add the functionality found by default in windows 2003 server to windows 2008 server. This is a useful tool for many. To just click start run then enter dsa.msc and click open. bang, active directory users and computers on a member server to access an AD object quickly. not so fast. In windows 2008, for some reason, this functionality was removed as a default feature. there's some logic behind it for sure. the first this that comes to mind is security. Although an average users doesn't have the permissions to actually make changes in the AD users and computers as they will not have the proper access rights and tokens, they can browse and poke in an area they need not be in.

So dsa.msc was removed from the default installation of windows 2008 member server. That's OK, it can be added pretty quickly and without a restart. The image shows the options to select to add the feature back into your member server and remember, during installation these options can be selected.


Share/Save/Bookmark
Enhance your Support Services with Online Desktop Support Software

Access servers, desktop, network switches and even firewalls remotely using remote access software  


Reset CISCO 5505 ASA to Factory Default

Reset CISCO 5505 ASA to Factory Default

Reset CISCO 5505 ASA to Factory Default


Share/Save/Bookmark

Enhance your Support Services with Online Desktop Support Software


You’ll need to use the Console Port to perform this procedure. Hook up the blue console cable to your DB 9 PIN serial port. Plug the other end into ‘Console’ port on the ASA 5505. The console port looks like a network jack. It’s above the USB ports and is surrounded with a blue color matching the console cable itself and says console right next to the port. Use hyper-terminal, click Start, Programs, Accessories, Communications, HyperTerminal, create a connection on Com1 using the terminal settings: 
    - Bits per second: 9600 
    - Data bits: 8 
    - Parity: None 
    - Stop bits: 1 
    - Flow control: None 
 After you open your connection through hyper-term, press enter a couple times. You should get a prompt similar to the following: ‘ciscoasa>’, or ‘nameofyourdevice>’ type ‘ena’ which is the abbreviation for "enable" to go to enable mode. Enter the password, or just press enter if there is no password set. type ‘config t’ type ‘config factory-default’ hit spacebar when the ‘more’ is displayed to get the next page of output. You want to get back to the prompt that looks like: ‘ciscoasa(config)#’ type ‘reload save-config noconfirm’ Make sure that the outside line is plugged into port zero, and your pc is plugged into any of the ports 1-7. The Cisco ASA has been reset to factory settings. DHCP is enabled on the Cisco device, and it’s internal IP address is now 192.168.1.1! Configure RDP Port Forwarding on a Cisco ASA 5505


Share/Save/Bookmark
Enhance your Support Services with Software for Online Desktop Support
Access servers, desktop, networks switches and even firewalls remotely on the web.  


Fix Error 1603 when you install QuickBooks Desktop

There are many causes to application not behaving as expected, there are of course networking errors. Networking connects devices all across the Internet and in immediate space around you.  Database issues are also caused by networking problems. there are occasion where applications that use databases simply don't install. The cause can be network or a simple compatibility not fully addressed by the software vendor, or the applications release was for up to a specific OS build number. An update on the client device has also been the cause of many application installation issues. A recent encounter with Intuit QuickBooks installation lead me to a solution not present in Intuit's Knowledgebase or forum support. The application installation error code was 1603. QuickBooks error 1603 is not uncommon, but the process to work around it as presented by Intuit support for QuickBooks error 1603 didn't solve it. Many were repetitive, understandable as to why, as that was the common process for solving multiple installation issues but was not successful for me. Those steps to resolve including downloading from Intuit an additional software troubleshooting component didn't resolve the QuickBooks desktop installation issue. In fact, the Intuit installation troubleshooting software also displayed an error. A unique discovery of a work around to QuickBooks error 1603 was found here. 


Verizon DSL Static IP 7500 Modem

Share/Save/Bookmark


At the end, after entering the IP address information and switching to bridged connection and bridged routing, enter the following URL to finalize the activation to the Internet and to get on the web if you're unable to connect.
This installation had Verizon model 6110f and model 7500 router modem shipped to the customer. Both models are not to be used. The modem that's supposed to be used is the the 7500 Verizon mode router because this customer has received a static ip address as part of their service.
So the VC1 configuration for static IP DSL service has to be configured from ppp (PPPoE) to bridged in order to have the static address applicable for the configuration. The ip address and gateway are supplied by Verizon. Just enter them as noted and then click apply. http://192.168.1.1/verizon/redirect.htm

To disable NAT on the 7500 DSL modem completely then you have to choose for the protocol Bridge from the drop menu and also choose bridge for Bridge Mode. The option for adding the public IP address provided by Verizon goes away. This option is for putting your own router/firewall in place behind the Verizon DSL modem instead of using the features provided by Verizon in the free modem/router. The public IP address that was provided by Verizon has to be placed on the WAN interface of your router/firewall. Once that's done, then go to the wireless configuration and disable wireless access. This is for security and because it wont work right in this bridged configuration.


Most routers and firewalls can be accessed remotely for configuration changes. desktops and servers are also remotely accessed for support. even if direct access is not available to the router or firewall, connection to the remote desktop or a server or desktop on the same or connected network enables administrators to update and change configurations of all devices. 

Enhance your Support Services with Online Desktop Support Software


Share/Save/Bookmark

How To Find Your Exchange 2007 version


How To Find Your Exchange 2007 version

The above is a shot of the results after running the command on an Exchange 2007 SP1 system.
Get-ExchangeServer : fl name,edition,admindisplayversion
How to get your Exchange 2007 version. Run the command in an Exchange Management Shell prompt: Get-ExchangeServer : fl name,edition,admindisplayversion

Configure RDP Port Forwarding on a Cisco ASA 5505


http://remotesupportsoftware.blogspot.com/2008/10/configure-rdp-port-forwarding-on-cisco.html - Configure RDP Port Forwarding on a Cisco ASA 5505 . This is a good simple code example of adding a port forwarding rule to a Cisco ASA 5500 series (in this case it was a Cisco ASA 5505) but it won;t differ much with other versions.

read more | digg story

PC Tech Support - Computer Desktop Software & Hardware, SAN

PC Tech Support. NetApps Storevault S550's reliability is a questionable feature. The storevault s550 is a feature rich SAN that's very useful for backup and for network storage such as windows users shares, databases, and other information technology storage needs.The question of whether it's iSCSI networking components are reliable is a concern. read more digg story

How to View Public Folders in Outlook 2007


Public Folders are not shown in the default view, you must be using the "Folder List" view in the Navigation Pane to see public folders. To change to the folder list view, click the Folder List button at the bottom of the Navigation Pane, or if you've reduced the number of buttons at the bottom, the folder list button will change to an icon that looks like a file folder.

How to View Public Folders in Outlook 2007

The process to view Public Folders in Outlook is you first need to launch the Outlook application. Once open, navigate to the "Go" menu located at the top of the screen. Within this menu, you'll find an option labeled "Folder List"; select this to proceed. After selecting "Folder List", a sidebar will appear on the left-hand side of the Outlook window. In this sidebar, scroll down until you see "Public Folders". This section houses all the public folders that your organization has set up. Click on the "+" sign next to "Public Folders" to expand and view all available folders. From here, simply select the public folder you wish to access. The content of the chosen public folder will then be displayed in the main pane of the Outlook window. Remember, accessing public folders in Outlook 2007 is a straightforward process that enables you to collaborate and share information within your organization effectively. 

Keep in mind that Public Folder usage will likely be phased out in later releases of Outlook. 

Share/Save/Bookmark


Recommended: Enhance your Support Services with Online Software for Desktop Support. Remotely access and control desktops and servers to provided better support. 

Microsoft HMC 4.5 Deployment Walkthrough - Does it Work

Computer Support - Adventure (Rated PG)Microsoft HMC 4.5 Deployment Walk-through - Does it WorkMicrosoft's HMC 4.5 Deployment Walk-through is an excellent document and I could say that it does work.I found some minor little errors in the doc but none that were significant enough for a person with a good level of experience with Microsoft products. Microsoft's HMC has come a long way since the 3.x versions. The features in Exchange 2007 have increased tremendously and one of the newest and long awaited capabilities is being able to break out the various functions of the messaging system to different servers much more easilty and effectively that previous version of the software. read more digg story

Microsoft HMC 4.5 Deployment Walkthrough - Does it Work

Computer Support - Adventure (Rated PG)Microsoft HMC 4.5 Deployment Walkthrough - Does it WorkMicrosoft's HMC 4.5 Deployment Walkthrough is an excellent document and I could say that it does work.I found some minor little errors in the doc but none that were significant enough for a person with a good level of experience with Microsoft prod

read more | digg story

Mac OS Can't Access Windows Server share - Only Administrator Account can Access

MacOS unable to access shares on windows server.  Mac OS Can't Access Windows Server share except only by an Administrator account. Try ...