Reset CISCO 5505 ASA to Factory Default
You’ll need to use the Console Port to perform this procedure.
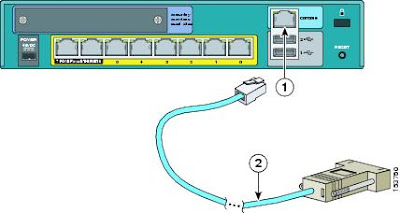
Hook up the blue console cable to your DB 9 PIN serial port. Plug the other end into ‘Console’ port on the ASA 5505. The console port looks like a network jack. It’s above the USB ports and is surrounded with a blue color matching the console cable itself and says console right next to the port.
Use hyper-terminal, click Start, Programs, Accessories, Communications, HyperTerminal, create a connection on Com1 using the terminal settings:
- Bits per second: 9600
- Data bits: 8
- Parity: None
- Stop bits: 1
- Flow control: None
After you open your connection through hyper-term, press enter a couple times. You should get a prompt similar to the following: ‘ciscoasa>’, or ‘nameofyourdevice>’
type ‘ena’ which is the abbreviation for "enable" to go to enable mode. Enter the password, or just press enter if there is no password set.
type ‘config t’
type ‘config factory-default’
hit spacebar when the ‘more’ is displayed to get the next page of output. You want to get back to the prompt that looks like: ‘ciscoasa(config)#’
type ‘reload save-config noconfirm’
Make sure that the outside line is plugged into port zero, and your pc is plugged into any of the ports 1-7.
The Cisco ASA has been reset to factory settings. DHCP is enabled on the Cisco device, and it’s internal IP address is now 192.168.1.1!
Configure RDP Port Forwarding on a Cisco ASA 5505

Enhance your Support Services with Software for Online Desktop Support.
Access servers, desktop, networks switches and even firewalls remotely on the web.
Fix Error 1603 when you install QuickBooks Desktop
There are many causes to application not behaving as expected, there are of course networking errors. Networking connects devices all across the Internet and in immediate space around you. Database issues are also caused by networking problems. there are occasion where applications that use databases simply don't install. The cause can be network or a simple compatibility not fully addressed by the software vendor, or the applications release was for up to a specific OS build number. An update on the client device has also been the cause of many application installation issues. A recent encounter with Intuit QuickBooks installation lead me to a solution not present in Intuit's Knowledgebase or forum support. The application installation error code was 1603. QuickBooks error 1603 is not uncommon, but the process to work around it as presented by Intuit support for QuickBooks error 1603 didn't solve it. Many were repetitive, understandable as to why, as that was the common process for solving multiple installation issues but was not successful for me. Those steps to resolve including downloading from Intuit an additional software troubleshooting component didn't resolve the QuickBooks desktop installation issue. In fact, the Intuit installation troubleshooting software also displayed an error. A unique discovery of a work around to QuickBooks error 1603 was found here.


