QuickBooks Error Code 1603 - How to Fix

How can QuickBooks Error code 1603 be fixed?

Thought to share my solution for fixing Quickbooks Error 1603 when installing Quickbooks Desktop Software. 


Please share this post and link https://pctechgo.blogspot.com/2022/09/quickbooks-error-1603.html so others could find it faster if this solution to fix Quickbooks Error 1603 works for you. 

 Fix QuickBooks Error 1603 While Installing QuickBooks Desktop

Already tried the recommended actions from Quickbooks knowledge-base but still get the error .Tech support doesn't know what to do. During an installation of Quickbooks, I encountered this error .And Quickbooks / Intuit knowledge base documentation suggested downloading and install the diagnostic tool to diagnose and possibly help fix the error . I received the same Quickbooks error 1603 while install the diagnostic tool. 

The OS was Windows 10. The user coincidentally had another computer,  another Windows 10 desktop, that had Quickbooks installed. So what's different , the build number. 

Fix Error 1603 when you install QuickBooks Desktop

Without getting into build number differences of Windows 10, let me provide the information I found and fixed Quickbooks installation error 1603. I tried all the recommended steps from Quickbooks and other posts and forums. 

Download the Quickbooks installer if you don't have it already. 

Right click the file and select properties. 


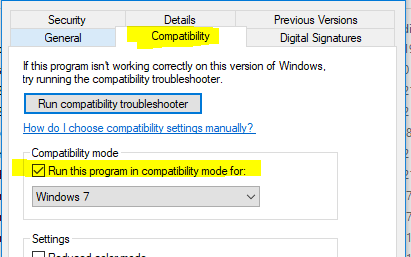
Then click on the compatibility tab. Check the Compatibility Mode, then runs compatibility for Windows 7. Save your changes and rerun the installation. 

Quickbooks Install Error 1603 on Azure Windows 10 virtual desktop 

Don't know if it made a difference but the desktop was a virtual machine in Azure. It was an Azure Windows 10 virtual desktop.


Please share this port and link so others could find this solution faster and easier. Thank you. 


Share/Save/Bookmark

How to Sync Changes in AD to Azure Manually

Sync Active Directory Changes to Azure AD.  


Manual delta sync to Azure
 

Syncing Changes in AD to Azure Manually

With an Azure AD connect server and services setup on your domain, password changes occur within seconds. 

Other property changes to Active Directory objects take longer to sync to Azure. Any user property, group property , or group membership changes all take a significantly longer time to sync. The shortest time possible is 30 Minutes . The sync time cannot be changed. it is set by Microsoft and cannot be modified with PowerShell or any other means. This is by design by Microsoft. 

Azure syncing and other issues related to Microsoft Active Directory and other productivity applications can be supported online. Online remote support software enables remote access    to systems such as servers and desktop through the web - https://www.4remotesupport.com/ . Also enabled is full remote control of keyboard and mouse, not just viewing capabilities are  available.   

Perform a Manual Sync 

There comes times when you want to sync changes made in your local domain environment to Azure quickly. This can be accomplished using a manual delta sync. It is a command line PowerShell option that will send recent changes in AD to Azure before the scheduled time. 

The following command when run on your AD Sync server will send changes immediately to Azure.

Open an elevated PowerShell session and run the following command as shown in the screen cap above. 

              C:\>Start-ADSyncSyncCycle -PolicyType Delta

Be sure to add the -delta at the end and if you have a spread out domain structure where your domain controllers are in multiple locations and syncing sometimes takes time, be sure to give enough time for the local changes to have replicated or force a sync of your local domain first. 


Share/Save/Bookmark


Simple Command to Display your SID


Simple Command to Display your SID

Two methods covered here are: 

        1. the whoami command 
        2. and wmic useraccount

One of the simplest commands to display your SID when logged into a domain joined desktop is using a command that's been a part of the Windows operating system even before windows 10.  

The whoami command displayed your current login. If you are providing remote support, this is also helpful if you are remotely accessing the desktop and troubleshooting an issue that requires knowing the user's SID. 

open a command prompt and run the command whoami and hit enter. The command;s' output displays the logged in user. 

run the command again and use the option /user and it will display the SID of the user like this: 

           C:\whoami /user 


CLI Command to Display User SID

To display the local Windows User SID, no domain use the following command line 
       
          wmic useraccount where name='username' get sid

Please share this link and post so others could find these two simple solutions faster and easier. Thank you. 

Share/Save/Bookmark


Whether you're using the command line to get information or solve a problem for yourself, or helping a friend or users in your office or local home network. Administrators and just plain computer users can access desktops remotely with online software for desktop support. Online Software for PC Support permits access to desktop. Perform screen-sharing and run commands or diagnostics. It's software to remotely access for remote control desktop computers, laptops, and servers to provided better support.  Affordable Online Remote Support Software for web based desktop screen sharing with unlimited connections and sessions. Try now. .


Show Database Server Name and Status of Connection - Citrix Delivery Controller

Support


Share/Save/Bookmark

Xenapp/Xendesktop - Find or Show the Citrix SQL server name Quickly and Check the Status

By checking to see if we are currently and correctly connected to both the Monitor and Configuration Logging database, the SQL server name will be displayed int he process plus the status. 

Open PowerShell on the delivery controller , don't forget to open "as administrator". And run the following commands to show the Citrix SQL server configured Citrix Studio and Site

    asnp Citrix.*

   To verify if we are correctly connecting to the required database 

    Get-MonitorDatastore

    Get-LogDatastore


The results of running the above PowerShell commands are shown below. Easy simple commands to display the server's name configured for the Site/Citrix Farm 
I've blotched out some names but the server's name is shown in the connection string. 


Citrix Releases
 7.x and later, there could be separate databases for Monitoring and Logging so therefore, one Connection string for Monitor/Logging service points to the Citrix site's datastore and one string of Monitor/Logging service points to the Monitor/Logging datastore.


Citrix as we know, is a fantastic system for providing desktop access to users. Support remote desktops and remote servers and Enhance Support Services with Online Desktop Support Software.  Screen-Sharing Remote Access Online of Remote Computers within seconds. Online desktop software is not limited to physical desktops or servers but can be and is utilized by virtual machines just as well. All virtual machines are supported, not just vmware vcenter and Microsoft hyper-v.

A post from the past regarding when the Farm's servers are not displayed in the management console, Farm and Citrix Servers Not Listed or Displayed in Console . It may still be extremely useful today for those still running past XenApp/XenDesktop servers and services. 


Mac OS Can't Access Windows Server share - Only Administrator Account can Access

MacOS unable to access shares on windows server.  Mac OS Can't Access Windows Server share except only by an Administrator account. Try ...