Mac OS Can't Access Windows Server share - Only Administrator Account Can Access

MacOS unable to access shares on Windows server. 

Mac OS Can't Access Windows Server share except only by an Administrator account.

Try this fix you will never find anywhere else.  It's original. Please share so fellow Mac users and Admins can find it faster. The method I used to access a Windows server share from a stubborn Mac is further down in this post, but there are some preliminary things you may have checked already. If not, they may be related to the issue as well. 

When attempting to access shares on a Windows server from an Apple MacOS device such as a desktop, users might encounter issues that can stem from various compatibility and configuration settings. When SMB shares will only connect using administrative accounts. 

You may find: 

Windows Security Log Event ID 4625

4625: An account failed to log on

Account For Which Logon Failed:

This identifies the user that attempted to logon and failed.

  • Security ID:  The SID of the account that attempted to logon. This blank or NULL SID if a valid account was not identified - such as where the username specified does not correspond to a valid account logon name.
  • Account Name: The account logon name specified in the logon attempt.
  • Account Domain: The domain or - in the case of local accounts - computer name.


A prevalent cause is related to the Server Message Block (SMB) protocol versions, namely SMB1 and SMB2, which are essential for facilitating file sharing over a local network. MacOS and Windows use SMB for network file sharing, but discrepancies in SMB version support or configurations can lead to access problems. Specifically, if the Windows server is an older server OS version and configured to use SMB1, which is outdated and less secure, newer versions of MacOS may struggle to connect due to their preference for the more secure SMB2 or later protocols. 

To check which versions are enabled on the server open PowerShell prompt on the server and execute the following command. The output will display, among other things, SMB version enabled on the server. 

              Get-SmbServerConfiguration

If you have already addressed and established SMB1 and SMB2 are enabled on the server read on.  

This connectivity issue is further complicated when trying to access shares as a standard user versus an administrator. An administrator account might have additional privileges that can bypass certain network restrictions or have the necessary rights to change SMB protocol settings, whereas a standard user account may lack these permissions.

 Users should also verify that their accounts have the appropriate permissions to access the desired shares on the local network. 

If you have already established that the user account, you are trying to access the share with from the mac HAS access to the share then continue. You can view the permission in various ways on the server. One method is open Computer manger and view the permissions properties of the shares "Shares".

It's crucial for network administrators to ensure that both MacOS and Windows server settings are aligned, favoring SMB2 or higher for security and compatibility reasons. Adjusting these settings requires administrator-level access to both the MacOS system and the Windows server, to tweak the network configurations accordingly. 

Alternate Solution - Fix Windows Share Access from a Mac  

Here is the trick that I used just today to get two mac desktops to access windows server shares. You won't find this solution anywhere else.

After determining the administrator account accessed without an issue, it was evident the protocols, network, DNS, and several other factors for accessing the share were working properly. Plus, the standard user account was able to access other server's shares (different servers on the same network). It was this one particular windows server that the standard user, any standard user account, from the mac had an issue. 

The giveaway for this situation was that in the server's log were entries for failed logins indicating a NULL SID for the user account. The name displayed correctly however (sorry, I had to blur the name to protect the innocent).


Only Administrator Account can access a Windows Share from Mac

Try this to fix Windows share access from a mac using a standard windows account particularly when only administrator can access windows share from mac.  

When only an administrator account can access a Windows share from a Mac, use the user's name that you're trying to fix  access for in the command below. This worked perfectly.  

On the server open a command prompt and run the command RUNAS like this to start notepad.exe on the server in the user's context. The same command can be used if the share is on Windows desktop (not a server). The command wouldn't require the domain portion. Type RUNAS /? to get command options and examples.


Once run, try accessing the server and shares again from the macs, it may solve your issue too.  I'm giving away a great a great trick that's I've used for other problems, testing, and now for solving the problem only administrator can access windows share from mac.


More detailed information on Event 4625:  https://www.ultimatewindowssecurity.com/securitylog/encyclopedia/event.aspx?eventID=4625


 Please share this post if it worked for you too. 


Add a comment if the solution to solve the problem of only administrator can access windows share from mac was useful or not or if you have a variant of the solution, or this post inspired a whole new method to fix the issue. It could help someone else with the same or similar problem accessing Windows shares from a Mac OS desktop or laptop. 


Centralize and Share RDP Connections

Share and Centralize RDP Connections Without a File Server


RDP (remote Desktop Protocol) was first introduced by Microsoft in the Windows NT Terminal Server operating system as a multiuser server platform. 

In an increasingly interconnected digital landscape, businesses require robust solutions for managing remote desktop protocol (RDP) connections efficiently. Leveraging software that offers centralized management of RDP connections has become essential to ensure seamless access and collaboration. This cutting-edge software eliminates the need for a traditional file server, streamlining the process and allowing users to share RDP connections online. Central access to RDP connections ensures that all team members can quickly and easily reach the resources they need without the complexities of individual setup protocols. By sharing RDP connections through a centralized platform, companies gain the advantage of uniformity and security, as access rights and credentials are managed in one secure location.

Moreover, this approach allows IT administrators to maintain and oversee all RDP sessions through a single pane of glass, drastically reducing the risk of unauthorized access. The ability to manage a multitude of RDP connections from a central repository enhances productivity, as users no longer need to remember multiple login details for different servers. With this online-based solution, users can experience the convenience of a central access point for all remote desktop needs. Sharing RDP connections via such software also means that updates and changes can be rolled out swiftly across the entire organization. Ultimately, a centralized RDP connection management software provides a powerful and streamlined mechanism for businesses to maintain control over their remote access infrastructure without the dependency on physical file servers.


Centrally Manage and Access RDP Connections

Businesses need reliable solutions for effectively managing remote desktop protocol (RDP) connections in an increasingly interconnected digital ecosystem. To guarantee smooth access and cooperation, using software that provides centralized control of RDP connections has become crucial. Users can share RDP connections online using this state-of-the-art software, which streamlines the process and does away with the requirement for a conventional file server. All team members will be able to swiftly and simply access the resources they require online without having to deal with the hassles of separate setup methods thanks to central access to RDP connections. Companies benefit from uniformity and security when they share RDP connections via a centralized platform since access privileges and credentials are maintained in a single, safe location.

Furthermore, this method significantly lowers the danger of unauthorized access by enabling IT managers to manage and supervise all RDP connections accessible through a single pane of glass. Productivity is increased when users can manage numerous RDP connections online from a single location, eliminating the need for them to remember separate login credentials for various servers. Users can enjoy the ease of a single access point for all remote workstations with this web-based solution. Updates and modifications can also be quickly implemented throughout the entire company by using such software to share RDP connections. Ultimately, organizations can retain control over their remote access infrastructure without relying on physical file servers thanks to a centralized RDP connection management software, which offers a strong and efficient mechanism for doing so.


Using Microsoft Remote Desktop on a Windows 11 PC - A Step-by-Step Guide

A Step-by-Step Guide to Using Microsoft Remote Desktop on a Windows 11 PC.

How to Setup and Access Microsoft Remote Desktop on a Windows 11 Computer: A Comprehensive Tutorial.

A Step-by-Step Guide to Using Microsoft Remote Desktop on a Windows 11 PC
Microsoft Remote Desktop on Windows 11 


I'm enjoying my Microsoft Windows 11 desktop. Not much more advantageous over Windows 10 for the standard user who uses general base everyday applications but nonetheless, it's really nice. I have a lab and office that are equipped with an array of computers that I utilize for various tasks, including of course testing. 

The lab, as anyone would guess, is mostly for testing purposes, I use a virtualization platform that's excellent for testing. Virtualization platforms are a great tool for testing software or configuration experimentation but also increases the number of desktops and servers available to connect to. Which leads to the point of using RDP for connecting to these various desktops and servers.  

Whenever I need to connect to and manage one of the physical or virtual desktops and servers, I use and rely on Microsoft's Remote Desktop. A wonderful built-in service and tool added to Windows operating systems by Microsoft. 

However, with Windows 11 installed on some of my PCs, I now need to ensure that I can use the latest version of Windows as both a host and a guest for my remote sessions. To do so, follow these steps if you also need to connect to or from a Windows 11 computer.


Using Microsoft Remote Desktop on a Windows 11 PC

Requirements

Please note that Remote Desktop is compatible only with Windows 11 Pro and Enterprise editions. Unfortunately, this tool is not accessible on Windows 11 Home. Additionally, I will guide you through the process assuming that both your host and guest PCs are connected to the same home or home office network. However, if you intend to use Remote Desktop to connect to a PC over the internet, such as from a home PC to a work PC, you will likely need to utilize a VPN or secure gateway to establish and safeguard the connection.


1. Enable Remote Desktop

To establish remote access and enable connection to your Windows 11 PC from another computer, you must initially configure it as a host. In Windows 11, navigate to Settings > System > Remote Desktop. 

Activate the Remote Desktop switch. Take note of the PC's name, as it will be required for the connection process.

 
Manage RDP Connection - Enable Remote Desktop


Manage RDP Connections - Enabling RDP Remote Desktop


System Settings for enabling RDP connections


2. Provide remote user access.

When logging in to your Windows 11 computer, the default is to use the admin account that is already set up, which is most likely your own account. However, if you need to give access to other accounts, you can do so by selecting the option for Remote Desktop users.

To add another account, simply click on the Add button. In the Select Users window, enter the name of the account you wish to add and then click on Check Names. Afterward, click OK and then OK again. This will enable you to sign in with that account when connecting remotely to this PC.


Manage RDP Connections, add users and permissions.


Connect from another guest computer.

To establish a remote connection with your Windows 11 PC from a different device or operating system, such as a Mac, iPhone, iPad, or Android device, you can utilize the Microsoft Remote Desktop app. Simply download and install the app that corresponds to your specific OS or device. For the purpose of this explanation, let's assume you are connecting from another Windows PC.

To begin, access the Remote Desktop tool on your guest PC. In Windows 10, you can find its shortcut in the Windows Accessories folder within the Start menu. In Windows 11, locate it in the Windows Tools folder on the All Apps screen. If you encounter any difficulty finding it, simply click on the Search icon, start typing "Remote Desktop," and select the result for Remote Desktop Connection.

Next, enter the name of your Windows 11 PC in the Computer field. Click on the "Show Options" button. If necessary, input the username of the account on the remote Windows 11 PC that you wish to utilize. If you desire an added layer of security, you can select the option to "Always ask for credentials," which will prompt you to enter your password each time you connect to this PC. Once you are prepared, click on "Connect" to initiate the connection.

Manage RDP Connections first add computer name or IP address
This is the standard RDP client interface. 
Click the connect button. 


Please enter the account password. Upon initial connection to a computer, a notification will appear indicating that the identity of the remote computer cannot be verified. You will be prompted to proceed with the connection. Select the option to "Remember my choice" for future connections to this computer. Confirm by clicking "Yes."


Check the box, don't ask again for RDP connections to this computer.


Once connected, you will find a blue connection bar at the top of the screen, offering various options. You have the ability to pin the bar in place and assess the connection speed using the icons on the left side. On the right side, you can minimize the remote window to the taskbar, adjust the window size, and end the remote session.


Manage RDP Connections with full screen desktop access.
Connect to and control the remote computer.


Use Windows 11 as a guest.

To utilize Windows 11 as a guest on another computer, ensure that the remote PC is configured to accept Remote Desktop connections. On your Windows 11 PC, access the Remote Desktop tool by navigating to the Windows Tools folder on the All Apps screen. 


Before establishing a connection, you have the option to customize specific settings for your remote session. A very useful setting is to enable access to local drives. Which means that if you enable checkbox, you'll be able to access your local drives from within the remote desktop session directly. In the Remote Desktop Connection window, click on the Show Options button. Within the General tab, you can add a username if necessary and choose whether to enable or disable the "Always ask for credentials" option.


QuickBooks Error Code 1603 - How to Fix

How can QuickBooks Error code 1603 be fixed?

Thought to share my solution for fixing Quickbooks Error 1603 when installing Quickbooks Desktop Software. 


Please share this post and link https://pctechgo.blogspot.com/2022/09/quickbooks-error-1603.html so others could find it faster if this solution to fix Quickbooks Error 1603 works for you. 

 Fix QuickBooks Error 1603 While Installing QuickBooks Desktop

Already tried the recommended actions from Quickbooks knowledge-base but still get the error .Tech support doesn't know what to do. During an installation of Quickbooks, I encountered this error .And Quickbooks / Intuit knowledge base documentation suggested downloading and install the diagnostic tool to diagnose and possibly help fix the error . I received the same Quickbooks error 1603 while install the diagnostic tool. 

The OS was Windows 10. The user coincidentally had another computer,  another Windows 10 desktop, that had Quickbooks installed. So what's different , the build number. 

Fix Error 1603 when you install QuickBooks Desktop

Without getting into build number differences of Windows 10, let me provide the information I found and fixed Quickbooks installation error 1603. I tried all the recommended steps from Quickbooks and other posts and forums. 

Download the Quickbooks installer if you don't have it already. 

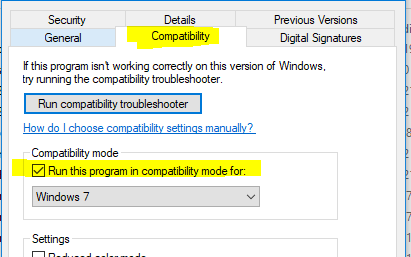
Right click the file and select properties. 


Then click on the compatibility tab. Check the Compatibility Mode, then runs compatibility for Windows 7. Save your changes and rerun the installation. 

Quickbooks Install Error 1603 on Azure Windows 10 virtual desktop 

Don't know if it made a difference but the desktop was a virtual machine in Azure. It was an Azure Windows 10 virtual desktop.


Please share this port and link so others could find this solution faster and easier. Thank you. 


Share/Save/Bookmark

How to Sync Changes in AD to Azure Manually

Sync Active Directory Changes to Azure AD.  


Manual delta sync to Azure
 

Syncing Changes in AD to Azure Manually

With an Azure AD connect server and services setup on your domain, password changes occur within seconds. 

Other property changes to Active Directory objects take longer to sync to Azure. Any user property, group property , or group membership changes all take a significantly longer time to sync. The shortest time possible is 30 Minutes . The sync time cannot be changed. it is set by Microsoft and cannot be modified with PowerShell or any other means. This is by design by Microsoft. 

Azure syncing and other issues related to Microsoft Active Directory and other productivity applications can be supported online. Online remote support software enables remote access    to systems such as servers and desktop through the web - https://www.4remotesupport.com/ . Also enabled is full remote control of keyboard and mouse, not just viewing capabilities are  available.   

Perform a Manual Sync 

There comes times when you want to sync changes made in your local domain environment to Azure quickly. This can be accomplished using a manual delta sync. It is a command line PowerShell option that will send recent changes in AD to Azure before the scheduled time. 

The following command when run on your AD Sync server will send changes immediately to Azure.

Open an elevated PowerShell session and run the following command as shown in the screen cap above. 

              C:\>Start-ADSyncSyncCycle -PolicyType Delta

Be sure to add the -delta at the end and if you have a spread out domain structure where your domain controllers are in multiple locations and syncing sometimes takes time, be sure to give enough time for the local changes to have replicated or force a sync of your local domain first. 


Share/Save/Bookmark


Simple Command to Display your SID


Simple Command to Display your SID

Two methods covered here are: 

        1. the whoami command 
        2. and wmic useraccount

One of the simplest commands to display your SID when logged into a domain joined desktop is using a command that's been a part of the Windows operating system even before windows 10.  

The whoami command displayed your current login. If you are providing remote support, this is also helpful if you are remotely accessing the desktop and troubleshooting an issue that requires knowing the user's SID. 

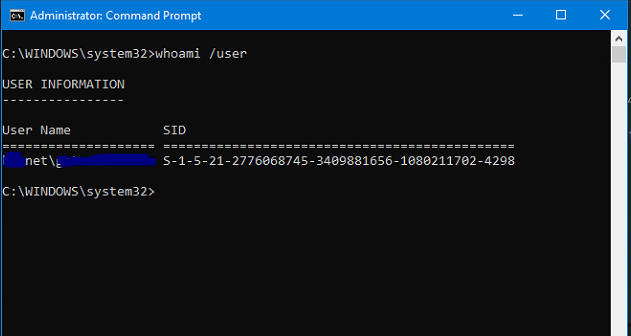
open a command prompt and run the command whoami and hit enter. The command;s' output displays the logged in user. 

run the command again and use the option /user and it will display the SID of the user like this: 

           C:\whoami /user 


CLI Command to Display User SID

To display the local Windows User SID, no domain use the following command line 
       
          wmic useraccount where name='username' get sid

Please share this link and post so others could find these two simple solutions faster and easier. Thank you. 

Share/Save/Bookmark


Whether you're using the command line to get information or solve a problem for yourself, or helping a friend or users in your office or local home network. Administrators and just plain computer users can access desktops remotely with online software for desktop support. Online Software for PC Support permits access to desktop. Perform screen-sharing and run commands or diagnostics. It's software to remotely access for remote control desktop computers, laptops, and servers to provided better support.  Affordable Online Remote Support Software for web based desktop screen sharing with unlimited connections and sessions. Try now. .


Show Database Server Name and Status of Connection - Citrix Delivery Controller

Support


Share/Save/Bookmark

Xenapp/Xendesktop - Find or Show the Citrix SQL server name Quickly and Check the Status

By checking to see if we are currently and correctly connected to both the Monitor and Configuration Logging database, the SQL server name will be displayed int he process plus the status. 

Open PowerShell on the delivery controller , don't forget to open "as administrator". And run the following commands to show the Citrix SQL server configured Citrix Studio and Site

    asnp Citrix.*

   To verify if we are correctly connecting to the required database 

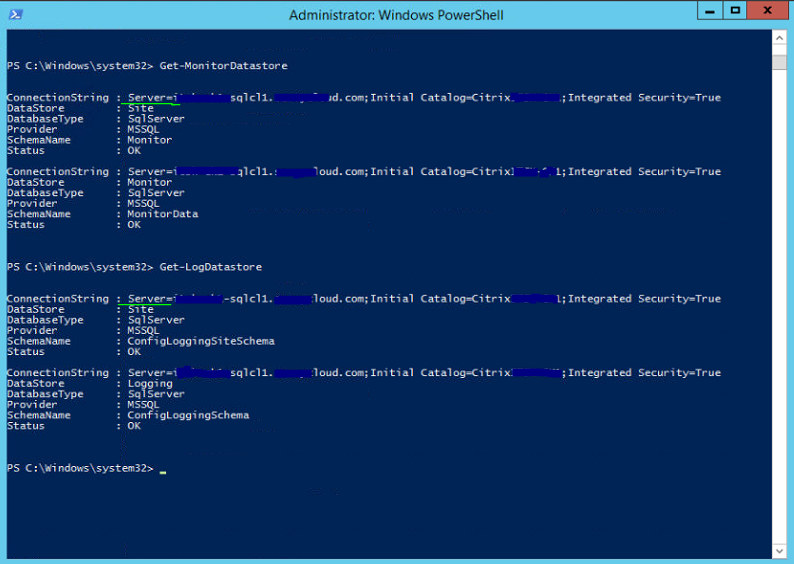
    Get-MonitorDatastore

    Get-LogDatastore


The results of running the above PowerShell commands are shown below. Easy simple commands to display the server's name configured for the Site/Citrix Farm 
I've blotched out some names but the server's name is shown in the connection string. 


Citrix Releases
 7.x and later, there could be separate databases for Monitoring and Logging so therefore, one Connection string for Monitor/Logging service points to the Citrix site's datastore and one string of Monitor/Logging service points to the Monitor/Logging datastore.


Citrix as we know, is a fantastic system for providing desktop access to users. Support remote desktops and remote servers and Enhance Support Services with Online Desktop Support Software.  Screen-Sharing Remote Access Online of Remote Computers within seconds. Online desktop software is not limited to physical desktops or servers but can be and is utilized by virtual machines just as well. All virtual machines are supported, not just vmware vcenter and Microsoft hyper-v.

A post from the past regarding when the Farm's servers are not displayed in the management console, Farm and Citrix Servers Not Listed or Displayed in Console . It may still be extremely useful today for those still running past XenApp/XenDesktop servers and services. 


Display Dell System Service Tag using Command Line

Use Command Line to Display Dell System Service Tag

This simple process works for desktops, laptops and servers. 


Share/Save/Bookmark

On  Windows system, all you need to display the service tag of a Dell computer desktop or server is built right into the operating system. Access to the command is as simple as just opening a command prompt window and run the following command:  

c:\> wmic bios get serialnumber

On the very next line the Dell service tag will be displayed. On a HP server or desktop, the same command will return the serial number. This is the serial number that is used to look-up drivers, software, or parts for your server or computer desktop, laptop or other device. 
Dell BCM or other third-party utilities are not needed. The service tag can be displayed in less than a minute or even seconds. Copy and paste the command into a Windows command window ("dos window" or "dos box") and hit enter. The functionality is built right into Windows. 


Command line to get the serial number or service tag of a white-box computer 

"White-box" systems might not return the desired results. if the manufacturer has not entered a service tag type of unique identifying number, then the following will be displayed "To Be Filled by O.E.M.".  


Retrieving the system serial number or Dell service tag on Linux using command line

The ability to retrieve the service tag or serial number of a system is not limited to Similarly to Windows, Linux has the functionality to retrieve and display the Dell service tag or system serial number of a system using a command line. The command line will differ of course. On Cent OS or Red Hat Linux for example, run the following command to retrieve the serial number or Dell service tag.

Command To Find Out Dell Service Tag

      # dmidecode | grep -i serial      
or 
      # dmidecode -t 1

 DMIDECODE might have to be installed first and can be installed by executing the following: 
       
# yum -y install dmidecode


WMIC and RDP Connections

Moreover, on Microsoft desktop or server operating systems, the CLI commands could also be run through an RDP connection session initiated and managed online by RDP connections management software. MacOS and Linux can also have RDP connection capabilities enabled but can more easily be used to manage RDP connections with an Online RDP connections manager using only a web-browser without add-ons or applications installed.  


Share/Save/Bookmark
Enhance your Support Services with Online Desktop Support Software. 


Provide better backups and disaster recovery. Recent setup of Azure blob storage for Veeam in Azure for a cloud offsite copy of Veeam backups. Online Support 
It was simpler than expected. It was similar if not exactly the same as setting up Azure storage for Azure Site replication. See the post below, not a step by step but briefly describes the simplicity. 


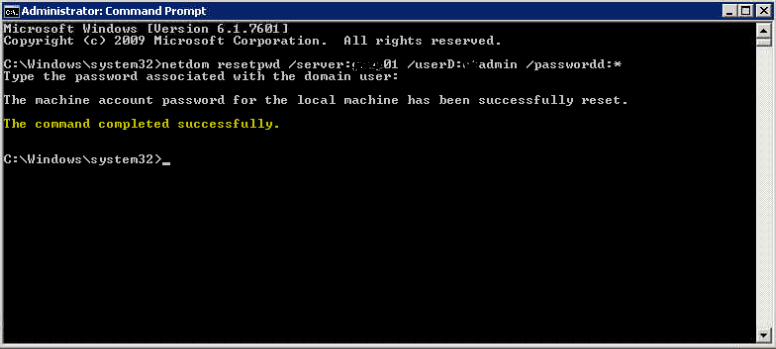
Netdom Access denied Resetting Machine Password

Netdom Access Denied Resetting Domain Controller Machine Password


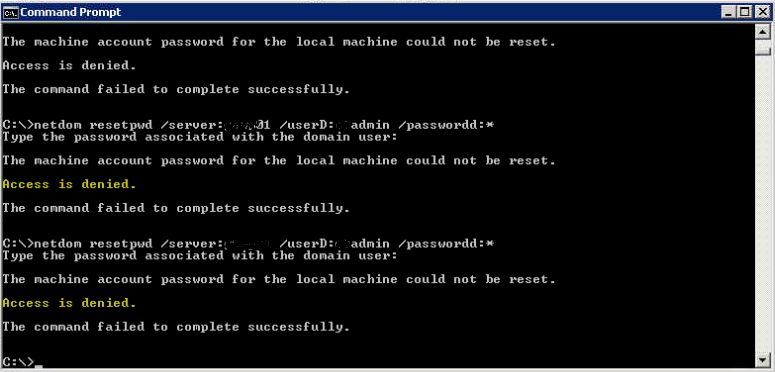
When trying to reset the machine account password using netdom, an access denied message is displayed. 


The machine account password for the local machine could not be reset.

This issue can be resolved by using an elevated command prompt.

Run the same netdom command to reset the local machine password from an elevated command prompt


Inexpensive cost effective remote desktop software for screen sharing online. Check out and try for free 4RemoteSupport's online desktop support software . Even if you have other software for managing remote desktops such as MSP RMM, not all software works all the time and 4RemoteSupport.com allows unlimited connections and is useful to get that first connection to a remote desktop or laptop system to add your RMM software like Datto or Nable.


Share/Save/Bookmark

Enhance your Support Services with Software for Online Desktop Support. 


Using Cent OS for VMware vCloud Director

When preparing and planning to install vCloud Director by VMware to provide a foundation of cloud services such as IaaS (Infrastructure as a Service), there are choices for which operating system can be used for some of the components.
Although there are choices, some are at no cost as they are freely distributable open source GNU licensed and others require a purchase to legally own and use the operating system for its intended use.

In the case of VMware vCloud Director installation and preparation, the choices for the operating system to use are all Linux based but can be Cent OS which is free and the other is Red Hat Enterprise Linux Server distribution which is not free - it is sold as a subscription. The lowest subscription is for two VMs and costs about the same as Windows Standard Edition server license. I do recall the time when it was free many years ago. The benefit is commercial support for the product. with Cent OS , your on your own except for tech forums.

Cent OS is freely downloadable and you may install it as many instances as needed both on physical systems and/or on virtual.

Failover then Failback of vCloud Director

For this VMware vCloud deployment, two Directors (vCD ) were installed. Two or more vCloud Directors can be load balanced by a typical http/https web load balancer. For this installation there were two but they were in a primary secondary configuration. The second director is a warm standby to the first. Failover was tested using two methods. One was to shut the vCloud Director VM off and the other was to just disconnect the virtual network interface card. The secondary vCloud Director started to take over fully at about 30 to 40 seconds in bot tests. No manual intervention was required. Failback of vCloud Director was not automatic. The secondary remained in charge and only when it was also turned off or the nic disabled was the a fallback.

VMware vCloud Director Using Cent OS for Operating system


As far as the installation of Cent OS for vCloud director, it had no real issues. The default install option of "Minimal" for Cent OS leaves too much networking and UI out to be a default for the VMware cloud solution. At a minimum, select Basic Server. Add desktops before by selecting Customize Now.


Issues or Problems using Cent OS for vCloud Director 

 The main and only issue encountered was the networking. One of the two system had an issue with routing. The vCloud Director installation requires two network interfaces for director. The ip addresses were assigned appropriately. Eth0 got one static ip address and the other network interface Eth1 was assigned another static ip address. They bot responded to pings however it was discovered that routing for these ping replies were coming from only one of the NICs . The other would see receive packets but never transmitted. One network interface card on the Cent OS was doing the transmitting for both nics.

This was fixed by modifying a configuration file related to routing at the Cent OS Linux level. This was not a VMware vCloud Director installation error.

Using Cent OS for VMware vCloud Director

I used Cent OS 6.4 x64 for a recent deployment of VMware vCloud Director. At the time of this writing Cent OS 6.5 was released, only a couple of months after the installation was completed. I recommend using Cent OS for vCloud Director. Neither server deployment has had any issues, not even a restart has been required since. The SSL certs also installed very easily with no issues, even swapping out the self signed certificate with a CA signed certificate presented no issue. You just nee to be able to work with a command line. It is proven to be fast enough to handle the role and on a tight budget, it is well worth it. Only minor issues were encountered that were easily solvable.


Cisco ISP Failover IP SLA Configuration Example

Cisco ISP Failover IP SLA Configuration Example


On some Cisco routers there is the command IP SLA and on other routers it is IP SLA MONITOR. Without going into the reasons for the differences including IOS features and versions, this post will focus and show a working example of IP SLA. To view a similar post containing IP SLA MONITOR please visit the following link:

IP SLA Monitor Example for Fail-over Survivability of ISP .

That post will contain a similar configuration example to the following that uses the ip sla monitor configuration to accomplish the same task of redundancy/failover of an ISP link. Also similar to this post is that the primary interface or ISP for a custom application is a T! and the redundant or fail-over ISP is a DSL.

Configure ASA to allow traceroute responses

Below is a configuration example for IS SLA (no monitor in the command line interface): Cisco IP SLA example configuration (not IP SLA MONITOR) also uses a track list and Boolean operator condition. This was a working configuration so the IP addresses have been modified. The remote office this configuration was used for has a T1 connection to the internet (a "legacy" T1) and a DSL directly attached to the router. The interface for the T1 was 0/3/0:0.1 and the DSL was GigabitEthernet 0/1. they wanted a custom application to use the T1 exclusively but in case there was a T1 internet access failure, they wanted to utilize the DSL as a failover. The custom application was critical to the business. The idea was simple, if the T1 fails, use the DSL for the custom application to connect to an online database source and server. 

There are some other mitigating factors that made this IP SLA configuration a little more challenging but I will not go into it at this time. It is not relevant actually to the commands used. The relevance came in to play in regards to what interfaces were to be used for sourcing the icmp ping used in the ip sla monitor. It is also the reason the line-code tracker in combination with the boolean operator and track list. There are two tracker objects in a tracker list. The list uses a boolean AND, track 10 ip sla 20 reachability --> a ping to a target ip address for which there is ONLY a single static route to use the T1 track 11 interface Serial0/1/0:0 line-protocol --> Interface status track 20 list boolean and --> boolean AND, two both conditions have to be met , almost seems redundant but TAC did this on another remote office router object 10 --> tracker 10 shown above object 11 --> tracker 11 shown above ip route 4.2.2.2 255.255.255.255 192.168.1.11 track 20 --> tracked main route ip route 4.2.2.2 255.255.255.255 192.168.1.1 100 --> alternate route is used if T1 is down ip sla 20 --> referenced in tracker 10 type echo protocol ipIcmpEcho 8.8.8.8 source-interface GigabitEthernet0/0 --> had to use the interface as source, using the ip address did not work. This is the "inside" interface . Yes, I know "inside" is more (another bug, perhaps) , there is a static route that says anny traffic for 8.8.8.8 use the T1 interface. so if there is a problem with the T1 the pings will time out. timeout 1000 --> max ping reply time allowed in milliseconds threshold 2 tag 20 frequency 5 --> status is checked every five seconds ip sla monitor schedule 20 life forever start-time now --> scheduler for monitor 20

Cisco IP SLA Example for ISP failover


Some Cisco routers have IP SLA without the command option of monitor and other Cisco routers have IP SLA MONITOR. The configurations vary slightly, just enough to throw you off just a little. Another simple article (or post) on a tech support for computers, servers, and routers blog site. It describes an example of how IP SLA was used for redundancy and how fears of asynchronous routing were dismissed. From what I have seen and found, support for ip sla monitor started at about the 12.3 release of Cisco's IOS for routers. The two connections or paths to a destination or the internet as it is most often used for, don't even have to be directly connected to the router.


Cisco ISP Failover IP SLA Configuration Example


Share/Save/Bookmark
Enhance your Support Services with Software for Online Desktop Support. 


An inexpensive cost-effective remote desktop software for screen sharing online. Check out and try for free 4RemoteSupport's online desktop support software . Even if you have other software for managing remote desktops such as MSP RMM, not all software works all the time and 4RemoteSupport.com allows unlimited connections and is useful to get that first connection to a remote desktop or laptop system to add your RMM software like Nable, Datto, or Kaseya for example. 


Farm and Citrix Servers Not Listed or Displayed in AMC


Farm and Citrix servers are not displayed in AMC (Access Manage Console).


I recently updated a 4.5 presentation server in a vmware test farm and server to AMC 4.6.2. After the update, that went without error, the farm and citrix server nodes in access management console were no longer displayed.
I used the solution found in CTX125827 : http://support.citrix.com/article/CTX125827
I ran the two scripts and the batch file and they worked. The farm showed up first then the presentation server.
After you perform the steps above you might get a discovery error and see ONLY the farm but not the presentation server (xennapp server). Configure discover and add the servers name into the list for discovery. That will get the server node to appear, the published apps, and everything else. If you keep getting discovery errors, the following is what I did:
I went to configuration tools and removed the current configuration and then exited the console, I started the AMC console again then recreated the configuration. NO more discovery errors.
___________________________________________

 Microsoft RDP has increased in usage. It is used by system and server administrators as much as it's used to connect to desktops for users to access applications remotely, such as RDP with RDS (terminal Services). Admins mostly use it for remote administration of the server in their data-centers but can also access users desktop remotely and control their systems with full remote access to correct as software
 
 Microsoft RDP, Remote Control For Administration of Server and Desktops


For those of you who are managing your Citrix Environment user profiles using Liquidware's Profile Unity and are curious as to how the compacting works. Please this post. For more details visit Liquidware's pages. The Screen capture here in this Liquidware Profile Unity Compacting VHD file manually works and works well.  

 
For a cost effective inexpensive remote access software for screen sharing online. Check out and try for free 4RemoteSupport online desktop support software . Even if you're using another software for managing remote computer desktops online such as RMM software intended for MSPs or basic remote access, not all software works all the time and 4RemoteSupport.com allows unlimited connections and is useful to get that first connection to a remote desktop or laptop system to add your RMM software like N-able,  Datto, or Kaseya for example. Online desktop connections with screen-sharing is used by millions or IT people everyday. It's the best tool and method for supporting end-users. 

Citrix XenApp and XenDesktop SQL servers, a Quick and easy PowerShell command line method to show the configured SQL server names.  This easy command line method to display the configured Citrix site database servers logging and monitoring servers (7.x and later permits using different servers for logging and monitoring). 


Share/Save/Bookmark

Migrating Printers to 2008 Server SBS from 2003 Server

More information about Print Management on Windows 2008 Server, including Windows SBS 2008 can be found at http://technet.microsoft.com/en-us/library/cc753109(WS.10).aspx  (Since the time of this writing, Microsoft changed names from SBS to Server Essentials)

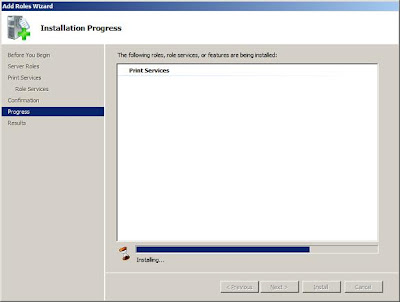
Start with adding te printer services role as shown above. This is done through server manager, click on the roles link in the upper right then select (check the box) Print Services . On the next step you can leave the default for most environments. Print server is the only option selected on a default installation of Printer Services on 2008 server.


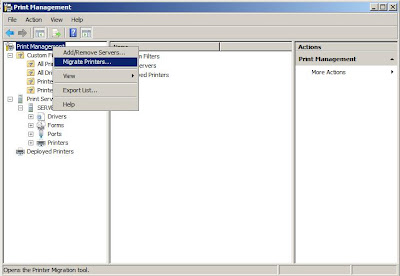
The migrate print server link shown near the bottom of the first/top image in this post has the following information:
To migrate print servers by using Print Management


- Open the Administrative Tools folder, and then click on Print Management.
- In the Print Management tree pane , right-click on the name of the computer that has the printer queues that you want to export from (this is your source server), and then click Export printers to a file option. This launches the Printer Migration Wizard.
- On the Select the file location page, specify the location to save the printer settings, and then click Next to save the printers.
- Right-click the destination or target computer (this should be your 2008 server, standard or SBS) on which you want to import the printers and have them accessible for your clients, and then click on the Import printers from a file option. This launches the Printer Migration Wizard.
- On the Select the file location page, specify the location of the printer settings file, and then click Next.
- On the Select import options page, specify the following import options:
Import mode. Specifies what to do if a specific print queue already exists on the destination computer.
List in the directory. Specifies whether to publish the imported print queues in the Active Directory Domain Services.
Convert LPR Ports to Standard Port Monitors. Specifies whether to convert Line Printer Remote (LPR) printer ports in the printer settings file to the faster Standard Port Monitor when importing printers.
- Click Next to import the printers.


___________________________________________

 Microsoft RDp has increased in usage. it is used by sysm and server administrators as much as it's used to connect to desktops for users to access applications remotely, such as RDP with RDS (terminal Services). Admins mostly use it for remote administration of the server in their datacenters but can also access users desktop remotely and control their systems with full remote access to correct as software
 
 Microsoft RDP, Remote Control For Administration of Server and Desktops


Password Complexity for SBS 2003 to 2008 Migration

Windows Server 2008 Password Policy Setting Recommendations

The following excerpt is from the Small Business Server 2008 Setup and Migration Help File:

"Password policies in Windows SBS 2008 enforce strong passwords by default, and the password policies dialog in the Windows SBS Console writes the configuration to the default domain policy. The password policy configuration is not written to the Small Business Server Domain Password Policy object, as in Windows SBS 2003. "

The password complexity is a small over-come-able problem that you could encounter during a migration from SBS2003 to SBS2008. The password complexity could lead to an even getting logged in the SBS migration and setup logs. The even doesn't tell you it's the complexity of the administrator account password, but instead leads you to believe that it the directory services restore mode password that has a problem. The complexity of the pasword required varies depending on the stage of the install. The 2008 SBS server when joining the domain is a client and uses it's own local policy which at this point is no password is required. when joining the domain, it uses the default policy for a domain controller not the policy that is already set for the domain controller in the domain group policy. once in the domain, it will use the policy that has already been established. So, when creating your answer file be sure to have a password complexity matching 8 characters and included uppercase, lower case, a number or a special character (!,@,#,$,%,etc>). If the administrator account that is being used for the migration does not match these characteristics then the migration will fail with and error "FATAL: DcPromo_JoinDomain: The server was not promoted to a domain controller" and an error telling you that "The Directory Services restore Mode password does not meet its complexity criteria" . BEFORE starting the migration, make the administrator password or the password for the administrator account that will be used for the migration match complexity requirements. I recommend, OVERMATCHING!, or you could be formatting the installation of the new SBS2008 server and trying the migration again. Use 14 characters or more is the main recommended action to over match - that's what I did.


.

PC Tech Go: You cannot log on to the console because the server is not synchronized with the database. Upgrade the server and then log on to the console

PC Tech Go: You cannot log on to the console because the server is not synchronized with the database. Upgrade the server and then log on to the console 
Please see the above article post for details. This problem with Symantec's management console was solved without having to remove the entire product.  The original source media was obtained and after running the install,  the console opened properly. 


Share/Save/Bookmark

Supporting Technology with Technology.: Enable 24 bit color in RDP for XP or 2003 Server


Supporting Technology with Technology.: Enable 24 bit color in RDP for XP or 2003 Server

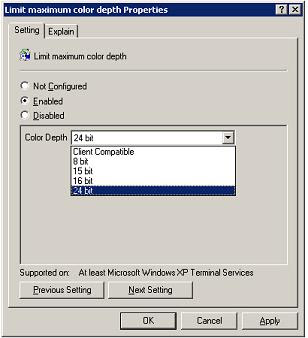
The default maximum color depth for rdp connections to Microsoft windows XP or Windows 2003 servers is 16 bit color. Connect with true colour 24 bit rdp to XP or windows 2003 server. The pre-defined default color limit on XP or windows 2003 server limits the color depth of RDP connections made to the the systems to a 16 bit maximum but can be changed by using group policy editor on the local system system. How to configure the "server side" of remote desktop to accept connections at 24-bit true color. Windows 7, Vista, and server 2008 already allow higher that 24 bit color by default.

How to add dsa.msc to 2008 member server

How to add dsa.msc to 2008,2012,2016,2019 member server.


Share/Save/Bookmark

Enhance your Support Services with Software for Online Desktop Support. 


It's a simple and quick installation to add the functionality found by default in windows 2003 server to windows 2008 server. This is a useful tool for many. To just click start run then enter dsa.msc and click open. bang, active directory users and computers on a member server to access an AD object quickly. not so fast. In windows 2008, for some reason, this functionality was removed as a default feature. there's some logic behind it for sure. the first this that comes to mind is security. Although an average users doesn't have the permissions to actually make changes in the AD users and computers as they will not have the proper access rights and tokens, they can browse and poke in an area they need not be in.

So dsa.msc was removed from the default installation of windows 2008 member server. That's OK, it can be added pretty quickly and without a restart. The image shows the options to select to add the feature back into your member server and remember, during installation these options can be selected.


Share/Save/Bookmark
Enhance your Support Services with Online Desktop Support Software. 

Access servers, desktop, network switches and even firewalls remotely using remote access software  


Featured Post (Selected for You)

Using Microsoft Remote Desktop on a Windows 11 PC - A Step-by-Step Guide

A Step-by-Step Guide to Using Microsoft Remote Desktop on a Windows 11 PC. How to Setup and Access Microsoft Remote Desktop on a Windows 11 ...